1Start here
Basic Suite is six plugins. You use them inside a music program, for example Logic Pro, Ableton Live or REAPER. This manual calls that program the host.
| Plugin | What it does |
|---|---|
| Basic EQ | Makes some frequencies louder or quieter. |
| Basic Compressor | Makes loud parts quieter, so the level is more even. |
| Basic Exciter | Adds harmonics to one band, so the sound is brighter or clearer. |
| Basic Gate | Makes the sound quieter when it is below a level. This removes noise between notes. |
| Basic Bandpass | Removes low frequencies, high frequencies, or both. |
| Basic Bloom | A synthesizer. You play it with a MIDI keyboard. |
What do you want to do?
- Install the pluginsmacOS or Windows
- Open a plugin in my hostLogic, Ableton, REAPER, others
- Pick a presetstart from a ready sound
- Use dark modefour colour palettes
- Fix a problemno sound, plugin not found
- Get helpemail or Instagram
Quick start
- Install the plugins (section 2).
- Open your host. Put a plugin on a track (section 3).
- Click the preset name at the top right. Pick a preset that sounds close to what you want.
- Play your track. Change one control at a time and listen.
- Save your project. The host keeps the plugin settings in the project.
What you need
- A Mac with macOS 11 or later (Apple silicon or Intel), or a Windows 10 or later PC (64-bit).
- A host that can load Audio Unit (AU) or VST3 plugins. Each plugin can also run as an app on its own (see section 3).
- For Basic Bloom: a MIDI keyboard, or the on-screen keys.
2Install
Save your work and close your host before you install.
macOS
- Download the Basic Suite installer (.pkg) from styley.ca.
- Double-click the .pkg file.
- Click Continue on each page.
- On the installation type page, keep Audio Units and VST3 selected. Clear one if your host does not use it.
- Click Install.The plugins go into the Library folder of your user account. You do not need an administrator password.
- Open your host. If it shows a plugin scan, let it finish.
Windows
- Download the Basic Suite installer (.exe) from styley.ca.
- Double-click the .exe file.Windows can show "unknown publisher". The installer does not have a Windows signing certificate. Compare the file's SHA256 with the value on styley.ca if you want to make sure it is the correct file.
- Pick VST3 plugins, Standalone applications, or both.
- Click Install.The VST3 plugins go into C:\Program Files\Common Files\VST3.
- Open your host. Scan for new plugins (see your host's manual).
Bloom is a separate, bigger synthesizer. It replaces Basic Bloom. If Bloom is installed, the Basic Suite installer removes Basic Bloom, because the two cannot be installed together. Bloom opens all Basic Bloom projects and has all its presets.
Remove the plugins
- Close your host.
- On macOS, open the folders ~/Library/Audio/Plug-Ins/Components and ~/Library/Audio/Plug-Ins/VST3. On Windows, open C:\Program Files\Common Files\VST3.
- Move the files that start with "Basic" to the Trash (macOS) or the Recycle Bin (Windows).
3Open a plugin
Put an effect on an audio track, a bus or the master track. Put Basic Bloom on an instrument track (a MIDI track). The plugins are under the maker name styley.
Logic Pro
- Effect: click an empty Audio FX slot on the track. Choose Audio Units › styley, then the plugin.
- Basic Bloom: make a Software Instrument track. Click the Instrument slot. Choose AU Instruments › styley › Basic Bloom.
Ableton Live
- Open the browser. Click Plug-ins.
- Open VST3 › styley (or Audio Units › styley on a Mac).
- Drag the plugin onto a track.
REAPER
- Click the FX button on the track.
- Type "basic" in the filter box.
- Double-click the plugin.
Other hosts
Look for the plugin list in the track's effects or instrument slot. Find the maker styley.
Without a host
Each plugin is also an app (standalone). On Windows, pick Standalone applications in the installer, then open the app from the Start menu. On macOS, the apps are in the ZIP download on styley.ca (the .pkg installer does not include them): copy them to the Applications folder. Choose your audio device in the app's settings.
4The window
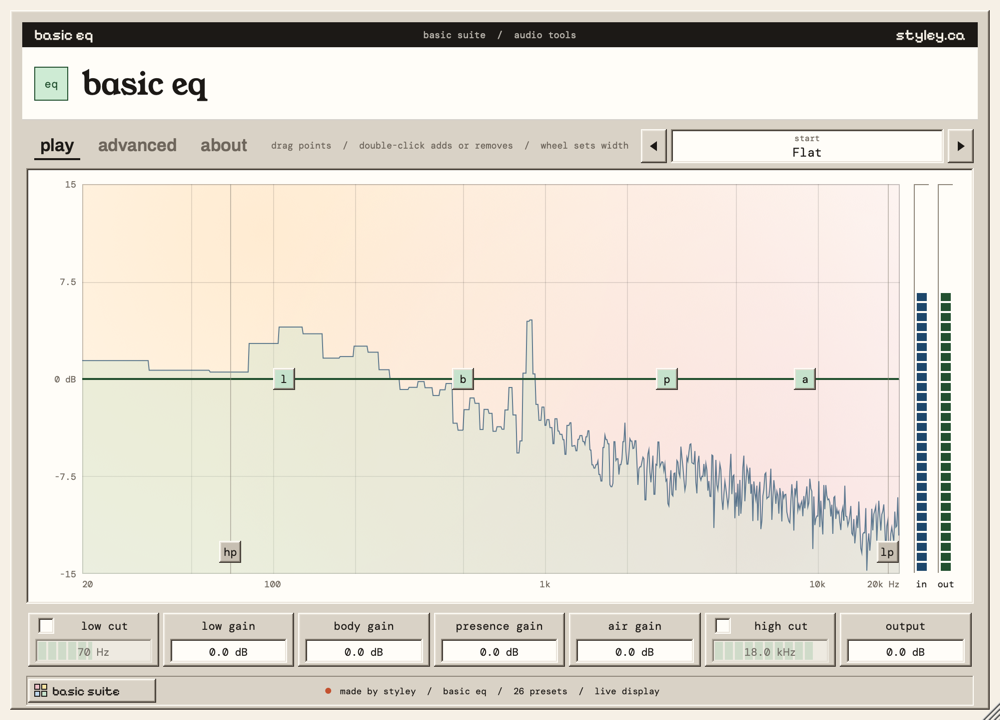
All six plugins have the same parts. The numbers in the picture match the list below it.
 1
2
3
4
5
6
7
8
1
2
3
4
5
6
7
8
- Name. The plugin's name and colour.
- Tabs. Click a word to change the view. play has the controls. advanced (Basic EQ only) has more controls. about tells you about the plugin, has help and colour settings.
- Hint. A short reminder of what you can do on the graph.
- Preset bar. The preset name and its group. Click the arrows to go to the previous or next preset. Click the name to see all presets.
- Graph. It shows what the plugin does to the sound, and the sound coming in. Drag the small squares (handles) to change controls.
- Controls. One box for each control. See section 5.
- Start button. It also opens the preset list.
- Status bar. The plugin name and the number of presets. The red dot shows that the display is live.
Drag the bottom-right corner of the window to make it bigger or smaller. The plugin remembers its tab in your project.
5Change a control
Each control shows its value as a bar of blocks, with the number in the middle.
| To do this | Do this |
|---|---|
| Change a value | Drag left or right on the bar. |
| Change it slowly | Hold Shift and drag. |
| Change it in steps | Put the pointer on the bar and turn the mouse wheel. |
| Go back to the start value | Double-click the bar. |
| Turn a band on or off | Click the small box beside its name. |
| Pick from a list | Click the box with the arrow. Click an item. |
| Use the graph | Drag a handle (a small square with letters). See each plugin's section. |
Change one control at a time. Listen after each change. If you are not sure, double-click the control to go back.
6Presets
A preset is a set of control values. Each plugin has 24 to 50 presets. Preset names tell you what they are for and what they do, for example "Kick, Cut Box 350 Hz".
Pick a preset
- Click the preset name at the top right.A list opens, in groups (for example vocal, drums, bass).
- Move the pointer to a group.
- Click a preset.
Try presets one by one
Click the arrows beside the preset name. They go through the presets in list order.
Changed presets
When you change a control, the preset bar shows modified and a * after the name. Your change is not lost. The host saves it with your project.
Save your own presets
Use your host's preset menu (for example Save As in the plugin window header of Logic Pro, or Save Preset in Ableton Live). The plugin does not have its own save button.
7Colours
There are four colour palettes: light, grey, dark and black.
- Click the about tab.
- Under COLOURS, click a palette.The window changes at once.
Your choice applies to every styley plugin, in every project, until you change it. Other open styley windows change within about one second.
8The plugins
This section tells you what each plugin does, what each control does, and how to do common tasks. "dB" is a unit of level. "Hz" and "kHz" are units of frequency (low numbers are low sounds).
Basic EQ
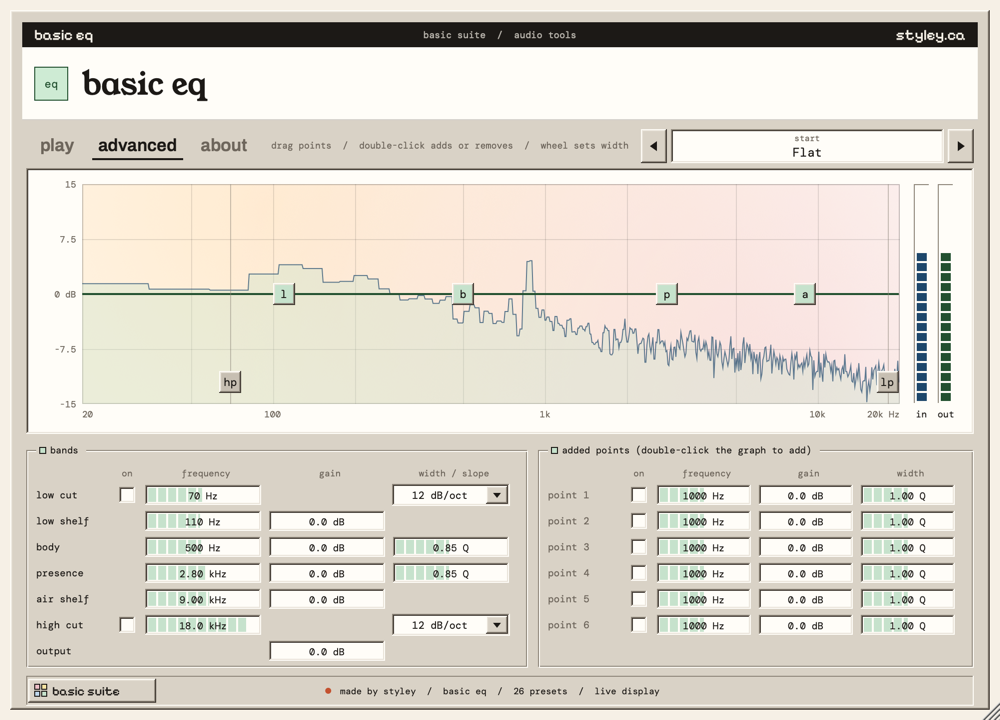
Basic EQ makes some frequencies louder or quieter. Use it to remove a bad tone (for example rumble or a boxy sound) or to make a good tone stronger.
| Control | What it does | Range |
|---|---|---|
| low cut | Removes sound below this frequency. Click the box to turn it on. | 20 Hz – 20 kHz |
| low cut slope | How fast the low cut removes sound. A higher number is steeper. | 6 – 48 dB/oct |
| low freq, low gain | A low shelf: makes all sound below the frequency louder or quieter. | 40 – 500 Hz, ±12 dB |
| body freq, gain, width | A bell: makes a band around the frequency louder or quieter. Width sets how wide the band is. | 120 Hz – 3 kHz, ±12 dB |
| presence freq, gain, width | A second bell, for the upper middle. | 600 Hz – 12 kHz, ±12 dB |
| air freq, air gain | A high shelf: makes all sound above the frequency louder or quieter. | 2.5 – 20 kHz, ±12 dB |
| high cut | Removes sound above this frequency. Click the box to turn it on. | 20 Hz – 20 kHz |
| high cut slope | How fast the high cut removes sound. | 6 – 48 dB/oct |
| points 1 – 6 | Six extra bells. Add them on the graph. | 20 Hz – 20 kHz, ±12 dB |
| output | The level after the EQ. | −12 to +6 dB |
Graph handles
- hp and lp: the low cut and high cut. Drag them to turn the cuts on and move them. Turn the mouse wheel on them to change the slope.
- l, b, p, a: low shelf, body, presence and air. Drag up for louder, down for quieter, left and right for frequency. Turn the mouse wheel to change the width.
- Double-click an empty part of the graph to add a point. Double-click a point to remove it.
Remove low rumble
- Drag the hp handle to the right until it is near 80 Hz.
- Listen. If the sound gets thin, drag it back to the left.
Find and cut a bad tone
- Double-click the graph to add a point.
- Drag the point up by about 6 dB.
- Drag it left and right slowly. Stop where the bad tone is loudest.
- Drag the point down below the line, by 3 to 6 dB.
The advanced tab shows all seven bands and the six points as numbers. Use it to set exact values.
Basic Compressor
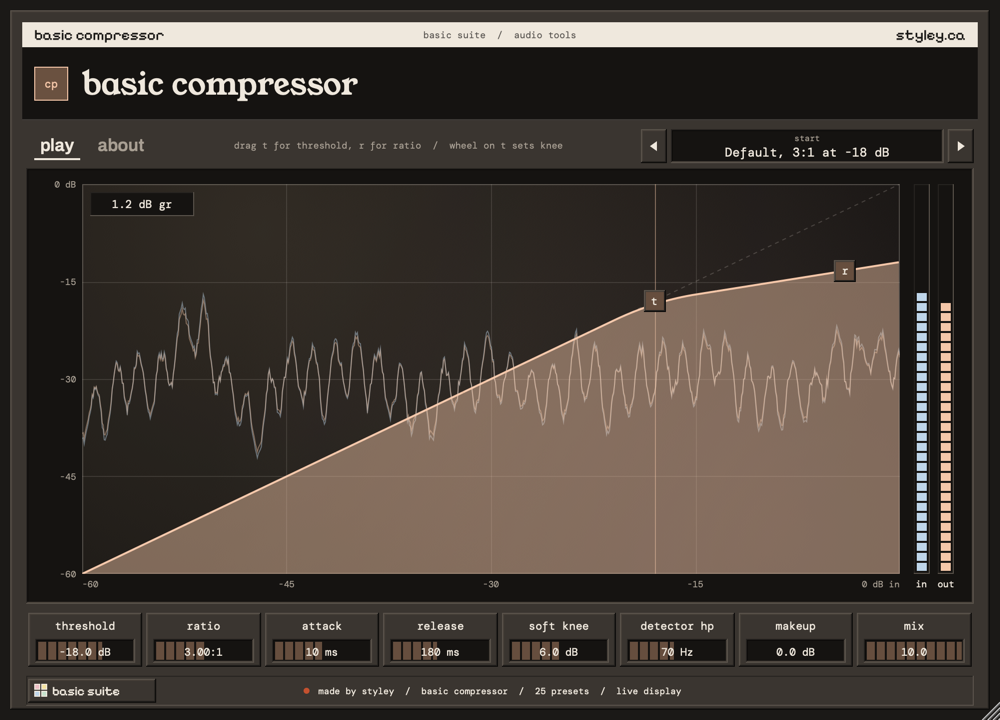
Basic Compressor makes loud parts quieter. This makes the level more even. The graph shows the curve: sound level in (across) and sound level out (up). The box at the top left shows how much the compressor turns the sound down now ("dB gr").
| Control | What it does | Range |
|---|---|---|
| threshold | The level where compression starts. Lower values compress more of the sound. | −48 to −4 dB |
| ratio | How much it compresses. 4:1 means 4 dB over the threshold becomes 1 dB. | 1:1 – 12:1 |
| attack | How fast it starts to compress. Slower attack lets the start of each hit through. | 0.2 – 100 ms |
| release | How fast it stops compressing. | 30 – 1500 ms |
| soft knee | Makes the start of compression gentler. | 0 – 12 dB |
| detector hp | Bass below this frequency does not push the compressor. | 20 – 300 Hz |
| makeup | Adds level after compression. | −12 to +12 dB |
| mix | 10 is all compressed sound. Lower values mix in the dry sound. | 0 – 10 |
Graph handles
- t: drag to set the threshold. Turn the mouse wheel on it to set the knee.
- r: drag up or down to set the ratio.
Make a vocal more even
- Pick the preset group vocal, or set ratio to 3:1.
- Play the loudest part. Lower the threshold until "dB gr" shows 3 to 6 dB on loud words.
- Raise makeup until the level is the same as with the plugin off.
Basic Exciter
Basic Exciter adds new harmonics to one band of the sound. This makes the sound brighter or clearer without a normal treble boost.
| Control | What it does | Range |
|---|---|---|
| focus | The lowest frequency of the band that gets harmonics. | 900 Hz – 12 kHz |
| drive | How hard the band is pushed. More drive gives more harmonics. | 0 – 36 dB |
| even / odd | The type of harmonics. Low values are even (smooth). High values are odd (harder). | 0 – 10 |
| harmonics | How much of the new harmonics is added. | 0 – 10 |
| harmonic limit | Removes added sound above this frequency. | 6 – 20 kHz |
| output | The level after the exciter. | −12 to +3 dB |
Graph handles
- f and l: drag to set the band (focus and harmonic limit).
- h: drag to set the harmonics. Turn the mouse wheel to set the drive.
Start with harmonics low. Turn the plugin off and on to compare. A little is often enough.
Basic Gate
Basic Gate makes the sound quieter when it falls below the threshold. Use it to remove noise or spill between notes and hits. It looks 1.5 ms ahead, so it opens before the sound starts. The host gets this delay and corrects it.
| Control | What it does | Range |
|---|---|---|
| threshold | Sound above this level opens the gate. | −80 to −6 dB |
| depth | How far the sound goes down when the gate is closed. | 0 – 72 dB |
| attack | How fast the gate opens. | 0.1 – 25 ms |
| hold | How long the gate stays open after the sound falls. | 0 – 500 ms |
| release | How fast the gate closes. | 25 – 2000 ms |
| hysteresis | The gate closes this much lower than it opens. This stops fast on-off flutter. | 0 – 12 dB |
| detector hp, detector lp | Only this band of the sound opens the gate. Use it to ignore, for example, a bass drum under a snare. | 20 – 500 Hz, 2 – 20 kHz |
| output | The level after the gate. | −12 to +6 dB |
Graph handles
- t, h, d: threshold, hysteresis and depth.
- hp, lp: the detector band.
Remove noise between hits
- Play the track. Drag t up until the noise between hits stops.
- If the start of a hit is cut, lower the threshold a little or make attack faster.
- If the end of a hit is cut, make hold or release longer.
Basic Bandpass
Basic Bandpass removes low sound, high sound, or both. With both cuts on, it keeps only a band in the middle.
| Control | What it does | Range |
|---|---|---|
| low cut | Removes sound below this frequency. Click the box to turn it on. | 15 Hz – 18 kHz |
| low slope | How fast the low cut removes sound. | 6 – 48 dB/oct |
| high cut | Removes sound above this frequency. Click the box to turn it on. | 30 Hz – 20 kHz |
| high slope | How fast the high cut removes sound. | 6 – 48 dB/oct |
| output | The level after the filter. | −12 to +6 dB |
Graph handles
- lc and hc: drag to move each cut. Turn the mouse wheel to change the slope.
- b: when both cuts are on, drag it to move the whole band.
Both cuts start off. You can move one cut past the other. The sound then gets very quiet, but the filter stays stable.
Basic Bloom
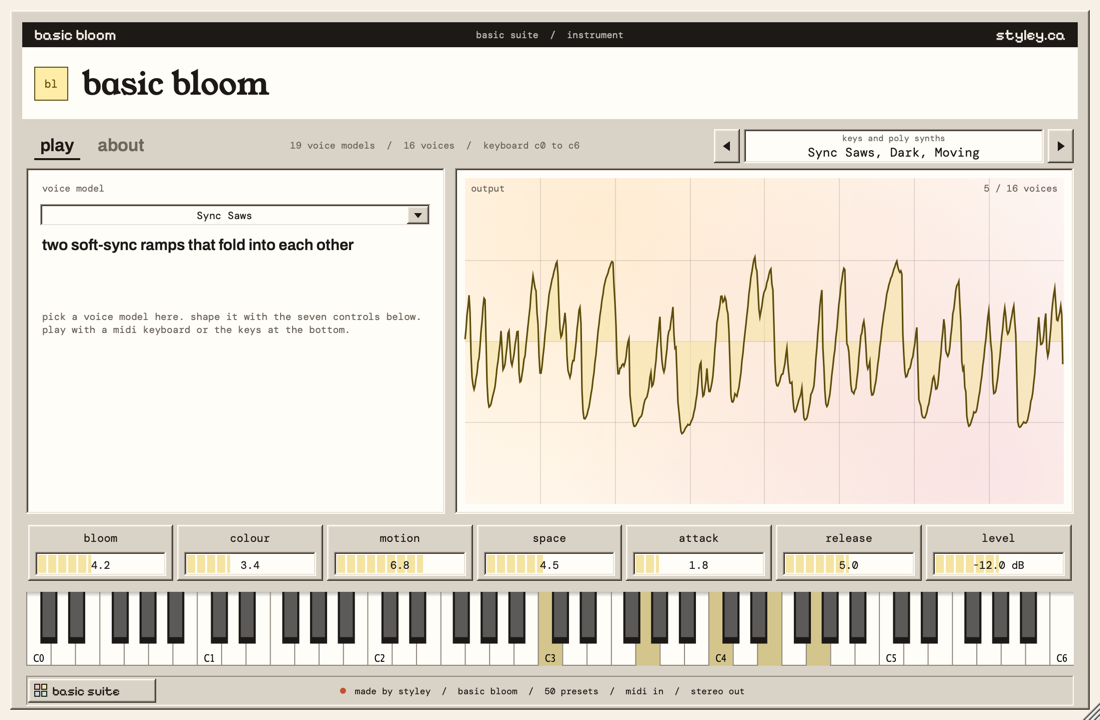
Basic Bloom is a synthesizer with 19 voice models. It makes every note as you play. It does not use samples. It plays 16 notes at the same time and responds to velocity, pitch bend and the sustain pedal.
 1
2
3
4
1
2
3
4
- Voice model. Click the box to choose one of 19 sound types. A short text tells you what it is.
- Output. A picture of the sound wave and the number of notes that sound now.
- Sound controls. Seven controls (see the table).
- Keys. Click them to play notes without a MIDI keyboard. They go from C0 to C6.
| Control | What it does | Range |
|---|---|---|
| voice model | The type of sound: Additive, FM Keys, Pluck, Sync Saws, Reed, E-Piano, Sub Bass, Metal Bell, Choir, Phase Distortion, PWM, Wavefold, Organ, Wind, Tuned Drum, Sine Pad, Saw Pad, Partial Swell, PM Pad. | 19 models |
| bloom | Makes the sound richer and warmer. More bloom adds gentle saturation. | 0 – 10 |
| colour | Makes the sound darker (low) or brighter (high). | 0 – 10 |
| motion | Adds slow movement: drift, detune and width. | 0 – 10 |
| space | Adds a stereo echo. More space gives a longer, louder echo. | 0 – 10 |
| attack | How fast each note starts. | 2 ms – 2 s |
| release | How long each note continues after you release the key. | 40 ms – 12 s |
| level | The output level. | −24 to 0 dB |
Play Basic Bloom
- Put Basic Bloom on an instrument (MIDI) track.
- Arm the track for recording, or select it, so your MIDI keyboard plays it.
- Pick a preset. Play.
Every preset plays at an even level from the lowest key to the highest key.
9If something is wrong
| Problem | Do this |
|---|---|
| I cannot find the plugins | Close and open the host again. Start a plugin scan (see your host's manual). Make sure you installed the format your host uses (AU or VST3). The maker name is styley. |
| Basic Bloom makes no sound | Put it on an instrument (MIDI) track, not an audio track. Select or arm the track. Click the on-screen keys: if they make sound, the problem is the MIDI keyboard or the track input. |
| An effect makes no sound | Check that the track plays sound with the plugin off. On Basic Gate, lower the threshold. On Basic Bandpass, make sure the low cut is not above the high cut. |
| The sound is too loud or distorted | Lower output (effects) or level (Basic Bloom). On Basic Exciter, lower drive or harmonics. |
| The preset bar shows "modified" | This is normal. It means you changed a control. Pick the preset again to go back to its values. |
| Basic Bloom is gone after I installed Bloom | This is correct. Bloom replaces Basic Bloom. Your projects open with Bloom. Basic Bloom's presets are in Bloom's legacy (basic bloom) folder. |
| The colours are wrong | Click about, then pick a palette under COLOURS. |
| Something else | Click about, then copy issue report. Paste it into an email to styley@styley.ca and tell me what happened. |
10Words in this manual
- host
- The music program that runs the plugins, for example Logic Pro, Ableton Live or REAPER.
- plugin
- A small program that runs inside a host and changes or makes sound.
- AU, VST3
- Two plugin formats. Logic Pro and GarageBand use AU. Most other hosts use VST3.
- standalone
- A plugin that opens as an app, without a host.
- preset
- A saved set of control values with a name.
- dB (decibel)
- A unit of level. +6 dB is about twice the level. −6 dB is about half.
- Hz, kHz (hertz)
- A unit of frequency. 20 Hz is a very low sound. 20 kHz (20 000 Hz) is a very high sound.
- dB/oct
- How fast a cut removes sound: the level change for each octave past the cut.
- harmonics
- Higher tones that sound with a note and give it its character.
- MIDI
- The note data that a keyboard sends to a synthesizer.
- velocity
- How hard you play a key. Harder notes are louder.
- handle
- A small square on a graph. Drag it to change one or two controls.
11Help and donations
Need help? Write to me.
- Email: styley@styley.ca
- Instagram: send a message to @styley.ca
Tell me the plugin name, your host and what happened. The about tab has a copy issue report button. It copies the details I need.
Donations
Basic Suite is free, so everyone has the tools to make music. Donations are welcome. They pay for future updates and new plugins. You can donate on styley.ca.
Why Basic Suite
Alternatives to stock plugins often cost money or suck. Most utility plugins are also a pain to look at.
Made by styley (Liam Patterson), Cobourg, Ontario. Fonts: Young Serif, Archivo, DM Mono and Pixelify Sans (SIL Open Font License). VST is a registered trademark of Steinberg Media Technologies GmbH. Audio Units and Logic Pro are trademarks of Apple Inc.